Eachine Falcon 250 Pro SP Racing F3 Getting Started Guide –
The missing manuals missing points!
Ordered the Eachine Falcon 250 Pro SP Racing F3 two weeks ago and it finally arrived yesterday. Fought quite some hours to get it to fly (mainly just because “you have to update and upgrade it first”).
This is my first flying device and I literally had no idea about the glossary related to this topic. I wanted to make this guide so people like me could avoid the most irritating pitfalls I dropped into.
There are two quite handy guides for this exact quad but both of them lack a bit information for newcomers and especially for those who just update the firmware and cry after that. Read those and this article after that.
This is quite good getting started guide:
DroneTest – Falcon 250 Pro getting started guide – the missing manual
This is a “review” which tells you awful a lot of those little things
Phaser Computers – Eachine Falcon 250 Pro Review – Guide to How It Should Of been Setup With Cleanflight
Everything you do beyond this point is in your own reponsibility.
This is mainly the DroneTests guide but I added some things and a bit rearranged it.
-
Remove the propellers!
- Charging your Battery
Put your battery on the charger now as you still remember to do so. It sucks to put it to charger when you are going to calibrate the ESCs. - Advanced (swap OSD UART Port)
Seriously, do this one first so you can test everything systematically. I guess that on the new one you can almost change the port with pinchers without even without disassembling - If you disassemble now use some zipties to tie the receiver antenna so that it doesn’t get hit by the propellers. Also you might want to attach the battery velcro now.
- Installing Cleanflight GUI
CleanFlight and the firmwares are updated quite regularly so many guides may look very different than the version you are running. BTW CleanFlight configurator has bugged setup screens preview. Allways shows a simple box.
When you have the drivers installed and you have connected your quad you can connect to it:
– Select correct COM-port (Check from Windows Device Manager).
– Select correct bitrate, 115200.
– Click connect.
– Didn’t work? Check drivers, COM-port etc. Try again, you cannot fail at point. - Back up your PID settings. Take screenshots, preferrably take screenshots of every page.
- Configuring your Flysky I6 Radio
So, this one. Gave me a ton of problems. I repeat: ONLY 5 of the 6 channels are connected out of the box! Another thing is that my i6 radio has poor sticks and/or was poorly calibrated at factory.
The stick channels are NOT at middle out of the box and YOU need to set those up.
Setup -> Functions setup -> Display
From here you can see at what values the radio is outputting and can use this to do coarse adjusts to them.
Setup -> Functions setup -> End points
As it says, you setup the end points here. If a channel doesnt go from end to end in the Display-window you can widen the endpoints here. ‘+%’ makes control go wider and ‘-%’ the opposite. I guess you want them to go as far as the “boxes” border.
Setup -> Functions setup -> Subtrim
If the Display window doesn’t show that the channel value is at middle point when the sticks are in the middle you can trim it here. This part is very much easier to do in CleanFlight.
FIRMWARE UPDATE (CleanFlight)
- You do this at your very own risk.
- At this point you might want to do the firmware update. I’m not sure if the settings recovery is bugged in my version or if I did something wrong (or it’s a feature) but it deleted all my settings. You can try it.
- Disconnect battery, leave USB connected, disconnect the quad from CleanFlight.
- Go to ‘firmware flasher’.
- Select board, on Eachine Falcon 250 Pro SP Racing F3 the right one is SPRACINGF3
- Choose firmware version, I guess allways preferred is the newest stable
- If I remember right the correct tics are ‘No reboot sequence’ off, ‘Full chip erase’ off, ‘manual baud rate’ on @256000
- Click Load Firmware [online]. This downloads the firmware from the servers to your pc. You can also load the firmware from CleanFlights GitHub.
- If you think you have done everything right, double check.
- Let the flasher do its thing, it says when it is done.
Getting the settings right
So, now that you have destoyed all your settings and nothing works you can read down the following stuff:
- If you did like I said and changed the UART-port in the beginning it’s now time to re-enable the MSP on it:

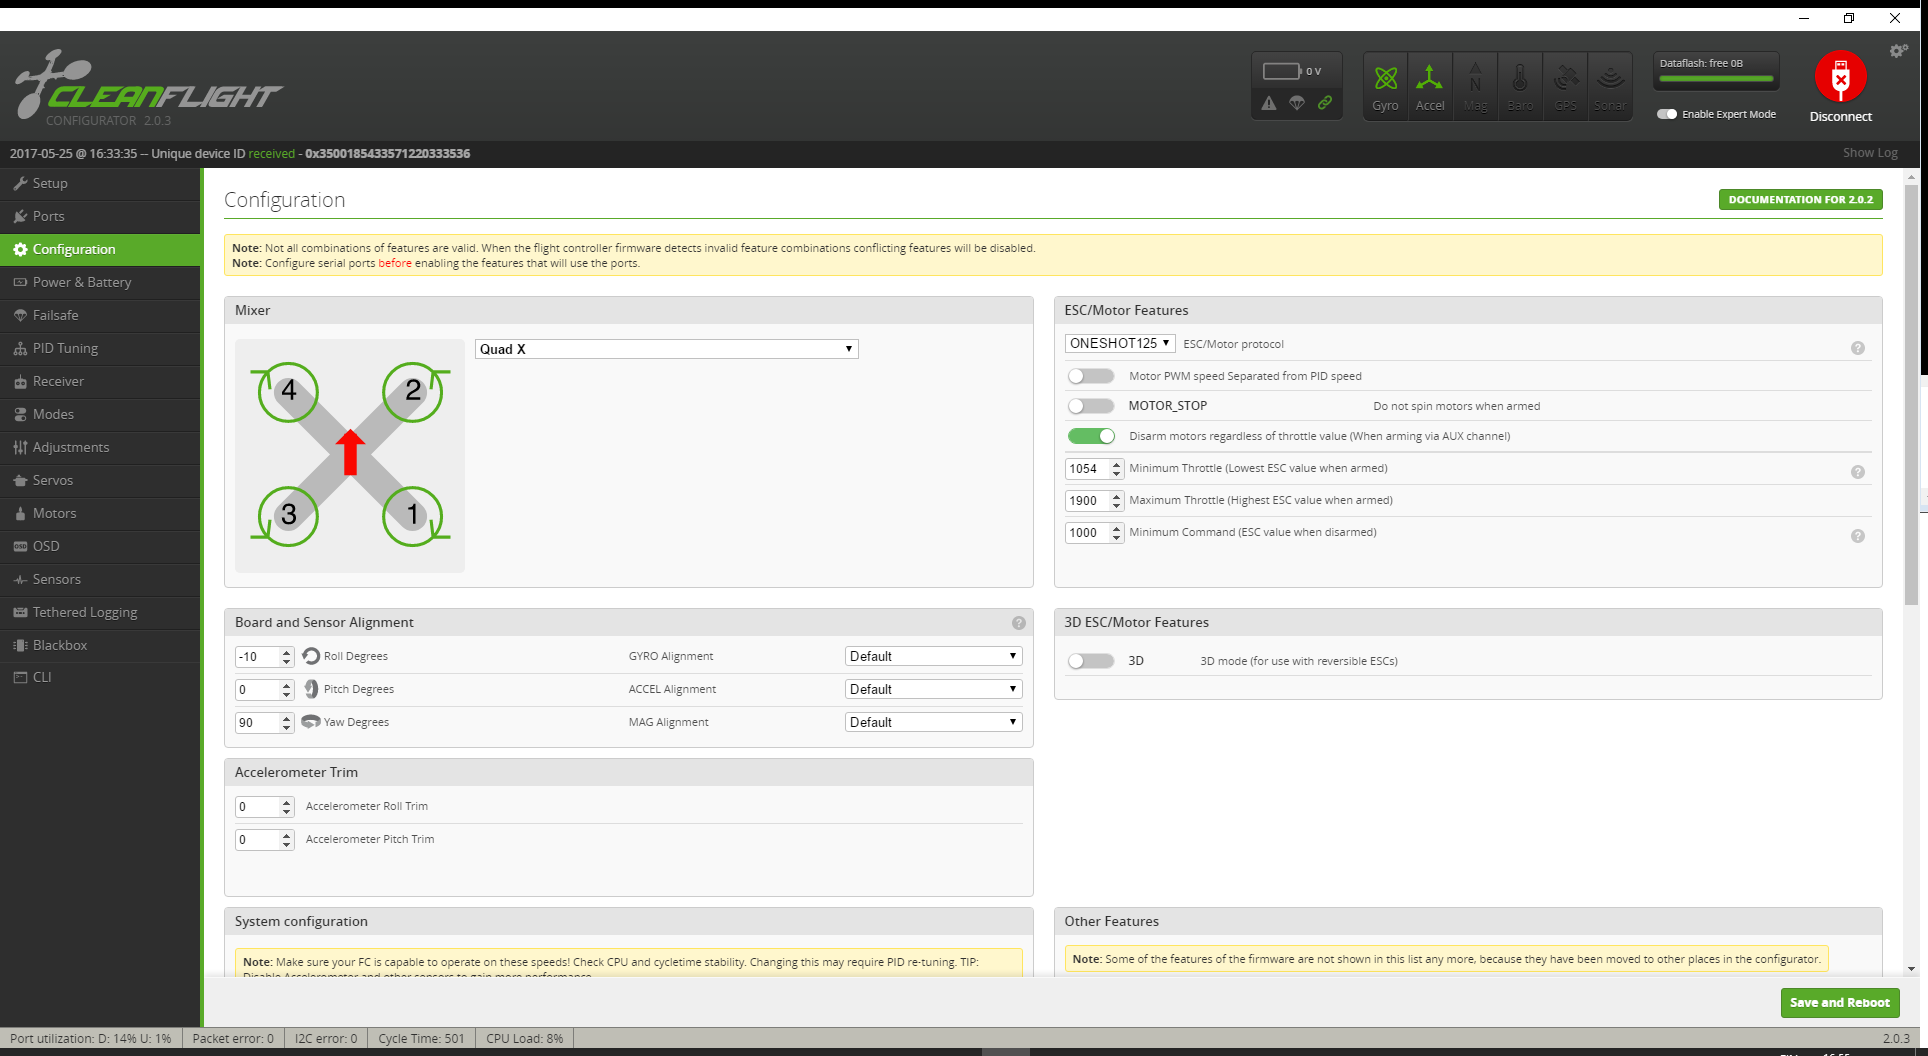
- Then the sensor configuration. You can leave the throttle settings as they are because we are going to calibrate the ESCs.
IMPORTANT: Turn the YAW 90 degrees as the FC is turned 90 degrees inside the quad. If you don’t do this it thinks it’s always sideways.
Also because you have the 10 degree tilt on your motors you might want to enable easy-mode and make the quad think it’s straight when it is at -10 degree pitched backwards. Because the board is 90 degrees turned you have to put the -10 degree pitch to ROLL.
 The next thing you want to do is to select right Receiver mode as it defaults to PPM RX. The Eachine set uses PWM RX mode. BTW, remember to save.

My board defaulted to some very weird PID values. These are not the perfect but you can get the quad up in the air with these.

- Setting up Flight Modes
I don’t really like having arming on the sticks and having only one AUX connected. That is why I put the flight mode and arming on the same switch.
When the SwC is UP nothing happens, MIDDLE angle mode and armed, DOWN horizon mode and armed.


Calibrating stuff
-
Remove the propellers!
- Attaching the FPV Antenna
Attach you antenna now please. I don’t want you to burn the transmitter board. Be careful as the antenna joint becomes quite hot.
- Put your radio on in the setup mode (Vulcan salute).
- Securing your Battery
Attach your full battery and connect it. Remember to put DIP4 ON. - Calibrate the radio
Alike we did in the beginning of this guide we now finish the radio calibration. When the stick channel end- and mid points stay in correct values you are good to go.
I think the most important things here are that the stick midpoints are right so that the quad won’t immeditially turn on its roof.

- Calibrate the ESCs
Do the steps 12-15 from the Phasercomputers guide.

12. Place Quad on flat surface and under setup, click calibrate accelerometer.
13. Go to Configration tab
– Change minimum throttle to 1000
– Change Maximum throttle to 2000
– You can also turn blackbox off here if you do not require it, it will give the CPU less work if so.
– Save and reboot
Your screen should look like this:

14. Now we need to calibrate ESC, go to the motor tab. remember, you should have removed props at the start, if you didn’t, DO THIS NOW.
– Unplug battery
– Click “I Understand the risks …….”
– Slide Master to MAX
– Plug in battery, wait till you have heard all different types of beeps.
– Slide Master to MIN
– ESC Calibration is now complete!
– Unplug battery, then plug in again. (power cycle it)
– Click on Master slide and slowing push up with your arrow until all motors come on (mine was 1097)
– If they come on at very different throttle inputs, redo your calibration!15. Now go back to the Configuration tab
– Change minimum throttle to your number. eg. 1097
– Change Maximum throttle to 1900
– Save and reboot
- Using the FPV Video Transmitter
- Falcon 250 LEDs
- Falcon 250 Pro OSD (on screen display)
- Attaching your Propellers

Hope this addon guide helped you with the problems!
Where to get one? FROM HERE: Banggood